1. はじめに #
Amazonアソシエイトをやってみました。AmazonアソシエイトのサイトからもURLリンクをコピーできますが、文字列だけで画像が表示できませんでした。
Hugoのショートコードを使って、画像付きのAmazonアソシエイトリンクを貼り付けられるように実装しました。
内容を以下にメモしておきます。 参考になれば幸いです。
2. AmazonのトラッキングIDを変数に入れておく #
Amazonアソシエイトに登録し、トラッキングIDを取得しておきます。文字列-22みたいな形のIDです。
取得したトラッキングIDを変数として扱えるようにconfig/_default/hugo.tomlに記載します。
config/_default/hugo.toml
[params]
  amazonTrackingID = "amazonトラッキングID-22"
3. ショートコード用のhtmlファイル作成 #
layouts/shortcodes/amazon-associate.htmlに以下のコードを記載しました。
参考までに載せておきます。
layouts/shortcodes/amazon-associate.html
{{ $asin := .Get 0 }}
{{ $title := .Get 1 | default "Amazonで詳細を見る" }}
{{ $img := .Get 2 }}
{{ $trackingID := .Site.Params.amazonTrackingID | default "MISSING_ID" }}
{{ $link := printf "https://www.amazon.co.jp/dp/%s?tag=%s" $asin $trackingID }}

{{ $finalImg := "" }}
{{ if $img }}{{ $finalImg = $img }}{{ else }}{{ $finalImg = printf
"https://m.media-amazon.com/images/P/%s.01.MZZZZZZZ.jpg" $asin }}{{ end }}

<div class="amazon-card-container" style="margin: 2rem 0; max-width: 700px; width: 100%; clear: both;">
  <a href="{{ $link }}" target="_blank" rel="noopener" class="amazon-card-anchor"
    style="text-decoration: none !important; color: inherit !important; display: block !important; line-height: 1.5; border-bottom: none !important; padding: 0 !important; margin: 0 !important;">
    <div class="amazon-link-card"
      style="border: 1px solid #d1d5db; border-radius: 0.75rem; overflow: hidden; background-color: #ffffff; display: flex; flex-direction: column; transition: all 0.3s ease; box-shadow: 0 2px 4px rgba(0,0,0,0.05); width: 100%; padding: 0 !important; margin: 0 !important;">

      {{/* メイン部分 */}}
      <div class="amazon-main-area"
        style="display: flex !important; flex-direction: row !important; padding: 1.25rem !important; align-items: flex-start !important; background-color: #ffffff !important; border: none !important; margin: 0 !important;">
        <div class="amazon-img-wrapper"
          style="flex-shrink: 0 !important; width: 110px !important; height: 110px !important; margin-right: 1.25rem !important; display: flex !important; align-items: center !important; justify-content: center !important; background: #fff !important; padding: 0 !important; border: none !important;">
          <img src="{{ $finalImg }}" alt="{{ $title }}"
            style="max-height: 100% !important; max-width: 100% !important; object-fit: contain !important; margin: 0 !important; display: block !important; border: none !important; pointer-events: none !important; box-shadow: none !important; padding: 0 !important;">
        </div>

        <div class="amazon-info-wrapper"
          style="flex-grow: 1 !important; min-width: 0 !important; padding: 0 !important; margin: 0 !important; display: block !important; text-align: left !important;">
          <div class="amazon-title-text"
            style="font-weight: 700 !important; font-size: 0.95rem !important; line-height: 1.5 !important; margin-bottom: 1rem !important; color: #1f2937 !important; word-break: break-all !important; text-decoration: none !important; border: none !important;">
            {{ $title }}
          </div>
          <div class="amazon-btn"
            style="display: inline-block !important; background: linear-gradient(to bottom, #f7dfa1, #f0c14b) !important; color: #111111 !important; padding: 0.4rem 1.2rem !important; border-radius: 4px !important; font-size: 0.85rem !important; font-weight: 500 !important; border: 1px solid #a88734 !important; text-decoration: none !important; line-height: 1.2 !important;">
            Amazonで見る
          </div>
        </div>
      </div>

      {{/* グレーの帯 */}}
      <div class="amazon-footer-area"
        style="font-size: 0.65rem !important; color: #6b7280 !important; text-align: right !important; padding: 0.6rem 1rem !important; background-color: #f3f4f6 !important; border-top: 1px solid #e5e7eb !important; margin: 0 !important; display: block !important; width: 100% !important; box-sizing: border-box !important;">
        Amazon.co.jp で詳細を見る
      </div>
    </div>
  </a>
</div>
4. ブラウザのブックマークにJavaScript登録 #
以下のコードをブラウザのブックマークに登録します。
javascript:(function(){
  async function copy(text) {
    try {
      await navigator.clipboard.writeText(text);
      alert('コピー成功!\n' + text);
    } catch (err) {
      /* 古いブラウザ用のフォールバック */
      const el = document.createElement('textarea');
      el.value = text;
      document.body.appendChild(el);
      el.select();
      document.execCommand('copy');
      document.body.removeChild(el);
      alert('コピーしました(fallback)');
    }
  }

  try {
    /* 1. ASINを探す(複数の候補から) */
    const asin = document.querySelector('#ASIN, [data-asin], input[name="idx.asin"]')?.value
               || document.querySelector('[data-asin]')?.dataset.asin;

    /* 2. タイトルを探す */
    const title = document.querySelector('#productTitle, #ebooksProductTitle, #title')?.textContent.trim();

    /* 3. 画像URLを探す(メイン、本、またはサムネイルリストから) */
    const imgEl = document.querySelector('#landingImage, #imgBlkFront, #main-image, .a-dynamic-image');
    let thumb = imgEl?.src || imgEl?.dataset?.oldHires || imgEl?.dataset?.aDynamicImage;

    /* URLがJSON形式(複数画像)で入っている場合の処理 */
    if (thumb && thumb.startsWith('{')) {
      thumb = Object.keys(JSON.parse(thumb))[0];
    }

    if (!asin || !title || !thumb) {
      console.error({asin, title, thumb});
      throw new Error('必須情報の取得に失敗しました');
    }

    const mUrl = thumb.replace(/\._S[X|Y]\d+_/, '._SL200_');

    const shortcode = `{{< amazon-associate "${asin}" "${title}" "${mUrl}" >}}`;
    copy(shortcode);

  } catch (e) {
    alert('エラー: Amazonの商品ページで実行してください。');
    console.error(e);
  }
})();
5. amazonの商品ページで4.で作成したブックマークを実行 #
amazonの商品ページで4.で作成したブックマークを実行すると、 コピーされるので、Hugo内の記事に貼り付けます。 以下のようなショートコードの形で貼り付けられます。
{{< amazon-associate "B0DJ8LD62M" "PFU キーボード HHKB Studio 日本語配列/雪(ポインティングスティック メカニカルキーボード)" "https://m.media-amazon.com/images/I/61d+MPkNrfL._AC_SX679_.jpg" >}}以下のようにamazonの商品画像が表示されるようになりました。
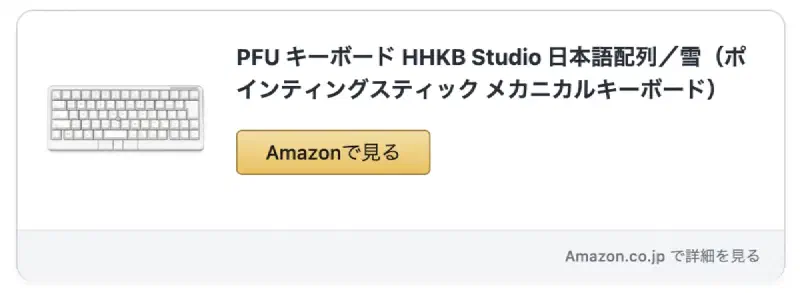
※サンプル画像で表示しています
6. アソシエイトリンクが有効になっているか確認 #
最後に、hugo server でローカルビルドを行い、リンクのデザインや画像が正しく表示されているか確認します。
あわせて、生成されたリンクをコピーしてAmazonアソシエイトの管理画面にある「リンク動作確認ツール」等で、トラッキングIDが正しく紐付いているかチェックしておくと安心です。
また、本機能を利用してアフィリエイトリンクを掲載する際は、景品表示法に基づくステマ規制対策として、当ブログのようにフロントマターの pr: true を有効化し、記事冒頭に「プロモーションが含まれています」等の広告明記(PR表記)を自動出力させる運用とセットで管理することをおすすめします。
本ブログでPR表記を実装した記事は下記です。